Friday 15 February 2013

Black and White Cheesecake with Strawberry Coulis♥

Ingredients:
Crust:
- Chocolate cookie crumbs (250ml)
- Margarine, melted (50ml)

Fillings:
- White Sugar (125ml)
- Cornstarch (20ml)
- Sour Cream (125ml)
- Vanilla (15ml)
- 1/2 Navel Orange
- 2 packages cream cheese, softened
- 2 large eggs

Strawberry Coulis:
- Strawberries (frozen and unsweetened) (500ml)
- White Sugar (60ml)
- Orange juice from your half orange


Method:
For the crust:

1) Position rack to the center of the oven. Preheat oven to 345°F
2) Remove the sides of a spring from pan and cover the bottom sides with foil
3) Use a pastry brush and margarine to cover sides
4) In a medium bowl, stir together the crust ingredients until combined
5) Press into the bottom of the pan. Bake for 15min
6) Cool on wire rack

Procedure for fillings:

1) Set oven temperature to 325°F
2) Zest one half orange. Careful, do not include the bitter white pith
3) In a medium bowl, blend the cream cheese with an electric mixer
4) In a small bowl, combine white sugar, cornstarch and zest
5) Add sugar mixture, sour cream and vanilla
6) Mix together until just blended
7) Break eggs into a custard cup and beat with a fork
8) Add to batter and mix for one minute or until very smooth
9) Pour carefully into the spring from pan
10) Bake 60 minutes or until the sides are puffy and the center quivers
11) Cool for another 20 minutes. Use a knife to loosen sides and remove from pan
12) Cool completely and then refrigerate


Procedure for Strawberry Coulis:

1) In a saucepan mix the sugar and the berries
2) Cook over a medium heat - about 10 min. Do not let mixture boil
3) Mash the berries and the strain through your colander
4) Discard pulp and refrigerate. Sauce may be thin but it will thicken when chilled.


This is baked and chilled cake :)


Ta-dah! After decoration with strawberry coulis and chocolate leaf :D♥


Truffles♥

Ingredients:

- Heavy Cream (210ml)
- Margarine (50ml)
- Semi-sweet chocolate (250ml)
- Flavouring (5-15ml)
- Cocoa powder or icing sugar for rolling balls


Method:

1) Put cream and margarine into a saucepan. Let margarine melt over medium heat then, stirring all the while, turn up heat and let the cream just come to a boil
2) Off the heat add the chocolate to the saucepan and stir until it is completely melted. Continue stirring until mixture thickens and cools somewhat
3) Stir in flavouring. Then let mixture thicken over an ice bath or refrigerate 1 hour.
4) To form truffles, scoop up portions of the chocolate with an ice cream scoop or spoon about the size of large marbles.
5) Dust a small plate with cocoa powder. Cover your hands with cocoa and then roll the balls in the cocoa.
6) Place the balls in candy liners.
7) Keep refrigerated!


Stir Stir Stir :)


This is just very lovely :D My finished product


Tuesday 5 February 2013

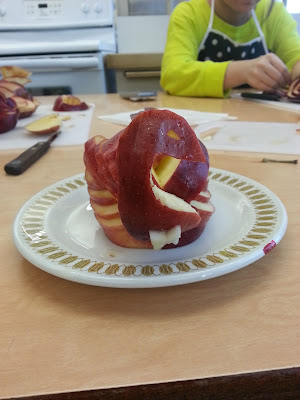
*Garnishing* Apple Bird♥

Last time I made a Cucumber Shark and a Watermelon Bowl. This time I made more fancy and pretty version of garnish which is the Apple Bird :)

It was not difficult as I thought. I thought the wing part was going to be very hard to cut :P I just had to work carefully with the paring knife to cut every pieces

Well, here is my finished product!


Chicken with Noodles♥

Ingredients:

- Vegetable Oil (15ml)
- Boneless skinless chicken (454g)
- Minced Garlic (10ml)
- Minced Fresh Ginger (10ml)
- Mushrooms, thinly sliced  (500ml)
- Water (125ml)
- Hoisin Sauce (60ml)
- Oyster Sauce (15ml)
- Fresh Udon noodles (1 pkg/ 400g)
- Snow peas (250ml)
- Sesame oil (5ml)


Method:

1) In a wok, heat vegetable oil over medium-high heat; stir-fry chicken, garlic and ginger until chicken is lightly browned, about 5 minutes.
2) Add mushrooms; stir-fry until beginning to soften, about 2 minutes. Stir in water, hoisin sauce and oyster sauce; bring to simmer.
3) Add noodles and toss to combine; simmer until sauce is thickened, 2 to 3 minutes. Add snow peas and sesame oil; cook for 1 minute.
4) Plate on a platter and add a garnish!


This is my finished product :) Yummy!


*Garnishing* Cucumber Shark+Watermelon Bowl♥

 
Garnishes are "edible" decorations placed on or beside food to provide contrast of colour, flavour or texture. Garnishing is an easy skill and a rewarding art to master. Food not only looks pretty when presented attractively, it seems to taste better too. Garnishes are meant to enhance, not take away from the food.
 
I had a fun time making my garnishes. It was kind of difficult at first to control the  paring knife but i got used to it so it became easier later. So I have made a Cucumber Shark and a Watermelon Bowl and these are the following results :)